
the π-box V-2 administration is done through an html page, that you can access to the adress 192.168.100.1 (can be changed) once connected to the wifi "pibox" (can be changed also) or through ethernet (all this can be set up and changed in the config file).
Check the WiFi around and connect to the WiFi called pibox (or the name you set up)
then, open a browser and open the address pibox.local or 192.168.100.1
the page will ask you to enter a login and a password, it should be by default : pibox / pnodeaccesspass
then, you're in to change the settings ! here what looks like the interface
The upper side of the interface shows the ip adress of the device, and which device provides internet (if connected).
The lower side is divided in two modes : Online mode (with internet access) or Offline mode (without internet access).
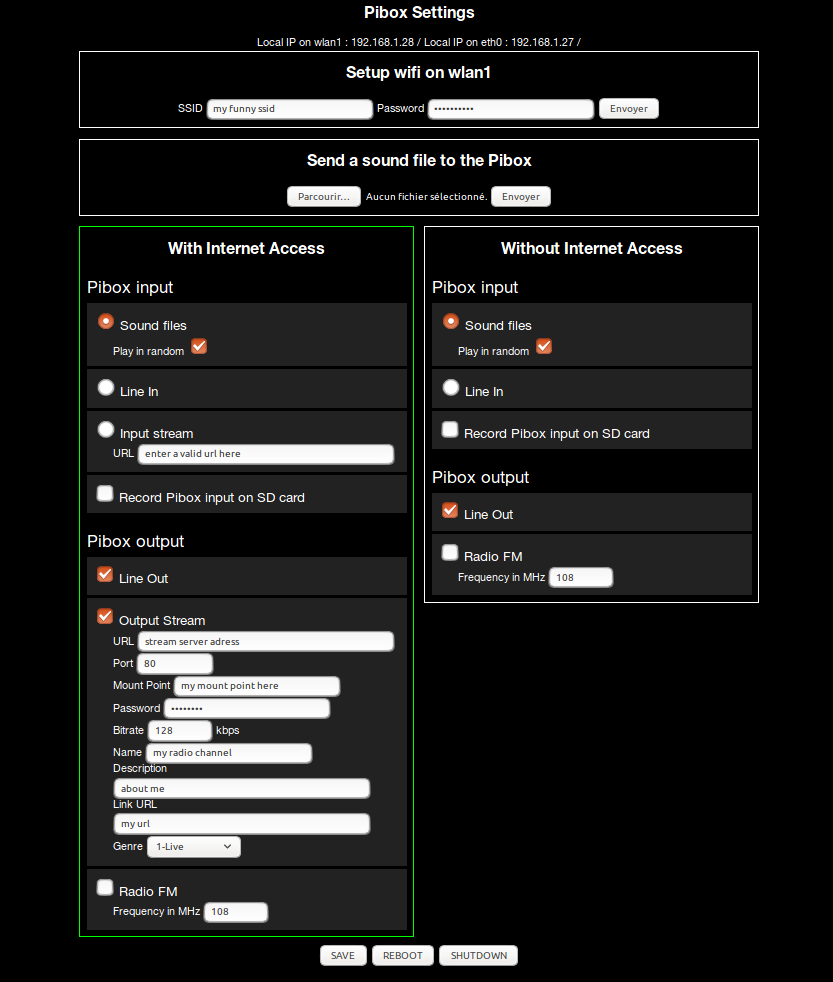
WIFI CONNECTION : you can enter a SSID and a password to connect to your favorite WiFi network. Ideal for connecting outside on a telephone that shares its connection. In case the info is wrong, the PiBox will search to create a connection on Ethernet (eth0), and in the case none of those options works, will enter the offline mode
UPLOAD FILES : allows you to select multi files on your hardware and put it on the storage spot of the π-box.
The files are stored in the following folder : /home/pi/pibox_V2/sounds/
Removal or renaming of files can be done either through ssh, by connecting to the pi with a keyboard and a monitor, or by inserting the SD card in your computer, and from your desktop.
INPUTS: choose an input from the following
OUTPUTS: select the output of your transmissions
All outputs can be associated simultaneously, and freely !
STREAM: enter the icecast server address to stream
The PiBox in offline mode is fully functional, except for the sources that comes from internet and necessitate a connection, same for the broadcast.
INPUTS: choose an input from the following
OUTPUTS: choose a output mode, all outputs can be associated freely
edit the file /etc/hostapd/hostapd.conf
$ sudo nano /etc/hostapd/hostapd.confchange the SSID by entering youn own value
     interface=wlan0
     driver=nl80211
     ssid=myssid
     hw_mode=g
     channel=7
     wmm_enabled=0
     macaddr_acl=0
     auth_algs=1
     ignore_broadcast_ssid=0
then
$ sudo rebootby entering the following
$ sudo raspi-configthen
$ sudo rebootAirtime is a simple, open source platform that lets you broadcast streaming radio on the web. https://www.sourcefabric.org/en/airtime/
To install it, install dependencies :
sudo apt-get install postgresql-9.4 python-virtualenv apache2 coreutils curl ecasound flac gzip libapache2-mod-php5 libcamomile-ocaml-data liquidsoap locales lsof monit mp3gain multitail patch php5-cli php5-curl php5-gd php5-json php5-pgsql php5-fpm php-apc php-pear pwgen python rabbitmq-server silan sudo sysv-rc tar unzip vorbisgain vorbis-tools zendframework icecast2/!\ for debian jessie, you must install postgresql-9.4 and not postgresql without -9.4 else the calendar does'nt show up /!\
Clone the repository and launch the installer :
git clone https://github.com/sourcefabric/Airtime
cd Airtime
sudo ./install
Follow the configuration process, at the end, you'll see the IP adress of the pibox on wich you can connect with a browser to finish the configuration threw the proposed interface
Réf : http://sourcefabric.booktype.pro/airtime-25-for-broadcasters/manual-installation/